Created with the Personal Edition of HelpNDoc: HelpNDoc's Project Analyzer: Incredible documentation assistant
Introduction
The MMG SIHAY eClaims System
The PhilHealth eClaims Management System is designed to help hospitals and clinics manage PhilHealth claims accurately, efficiently, and in compliance with PhilHealth standards. The system centralizes patient eligibility checking, claim encoding, document management, transmittal, tracking, and reporting into one secure platform.
By reducing manual processes and organizing claim data in a structured workflow, the system helps minimize errors, avoid returned or denied claims, and improve reimbursement turnaround time. It supports daily operations of billing and claims staff while providing real-time visibility into claim status and performance.
This manual serves as a guide for users to understand the system features, workflows, and proper usage to ensure smooth and compliant PhilHealth claims processing.
Mission
To provide hospitals and clinics with a reliable and efficient system that simplifies PhilHealth claims processing, reduces errors, and supports timely reimbursement through accurate, standardized, and compliant workflows.
Vision
To be a trusted eClaims solution that empowers healthcare facilities to deliver better service, improve operational efficiency, and achieve zero returned or denied PhilHealth claims through technology and process excellence.
Purpose of the Manual
This manual aims to:
- Guide users in navigating and using the system correctly
- Explain system features and workflows clearly
- Ensure proper encoding, transmittal, and monitoring of claims
- Support compliance with PhilHealth rules and requirements
Intended Users
This manual is intended for:
- Billing and claims staff
- PhilHealth coordinators
- Administrative users
- System administrators
Each user role should follow the procedures described in this manual to ensure accurate and consistent system use.
Scope of the System
The PhilHealth eClaims Management System covers:
- Patient eligibility checking
- CF2 and CF4 encoding
- Document and attachment management
- Claim transmittal and monitoring
- Reporting and reconciliation
- User and facility setup
Created with the Personal Edition of HelpNDoc: Transform Your Word Document into a Professional eBook with HelpNDoc
Welcome
Medical Mission Group Hospitals and Health Services Cooperative of the Philippines Federation
MMG SIHAY eClaims System
@2026 MMGHHSCP FEDERATION - FEDCIS 20231223.002
Created with the Personal Edition of HelpNDoc: Free help authoring tool
Getting Started
Created with the Personal Edition of HelpNDoc: Free EPub and documentation generator
System requirements
MMG SIHAY eClaims System Requirements
System Requirements
Hardware Requirements
1. Workstations
- Minimum Intel Core i3 processor (or equivalent)
- Minimum 8 GB RAM
- Minimum 256 GB storage
2. Networking
- Reliable LAN/WAN infrastructure with high-speed internet access
- Wireless access points for mobile device connectivity
- Network security appliances such as firewalls and intrusion detection/prevention systems
Software Requirements
1. Operating System
- Windows 10 or later
Created with the Personal Edition of HelpNDoc: Maximize Your Productivity with HelpNDoc's CHM Help File Creation Features
The SIHAY eClaims System
Created with the Personal Edition of HelpNDoc: Streamline Your Documentation Process with a Help Authoring Tool
Login Interface
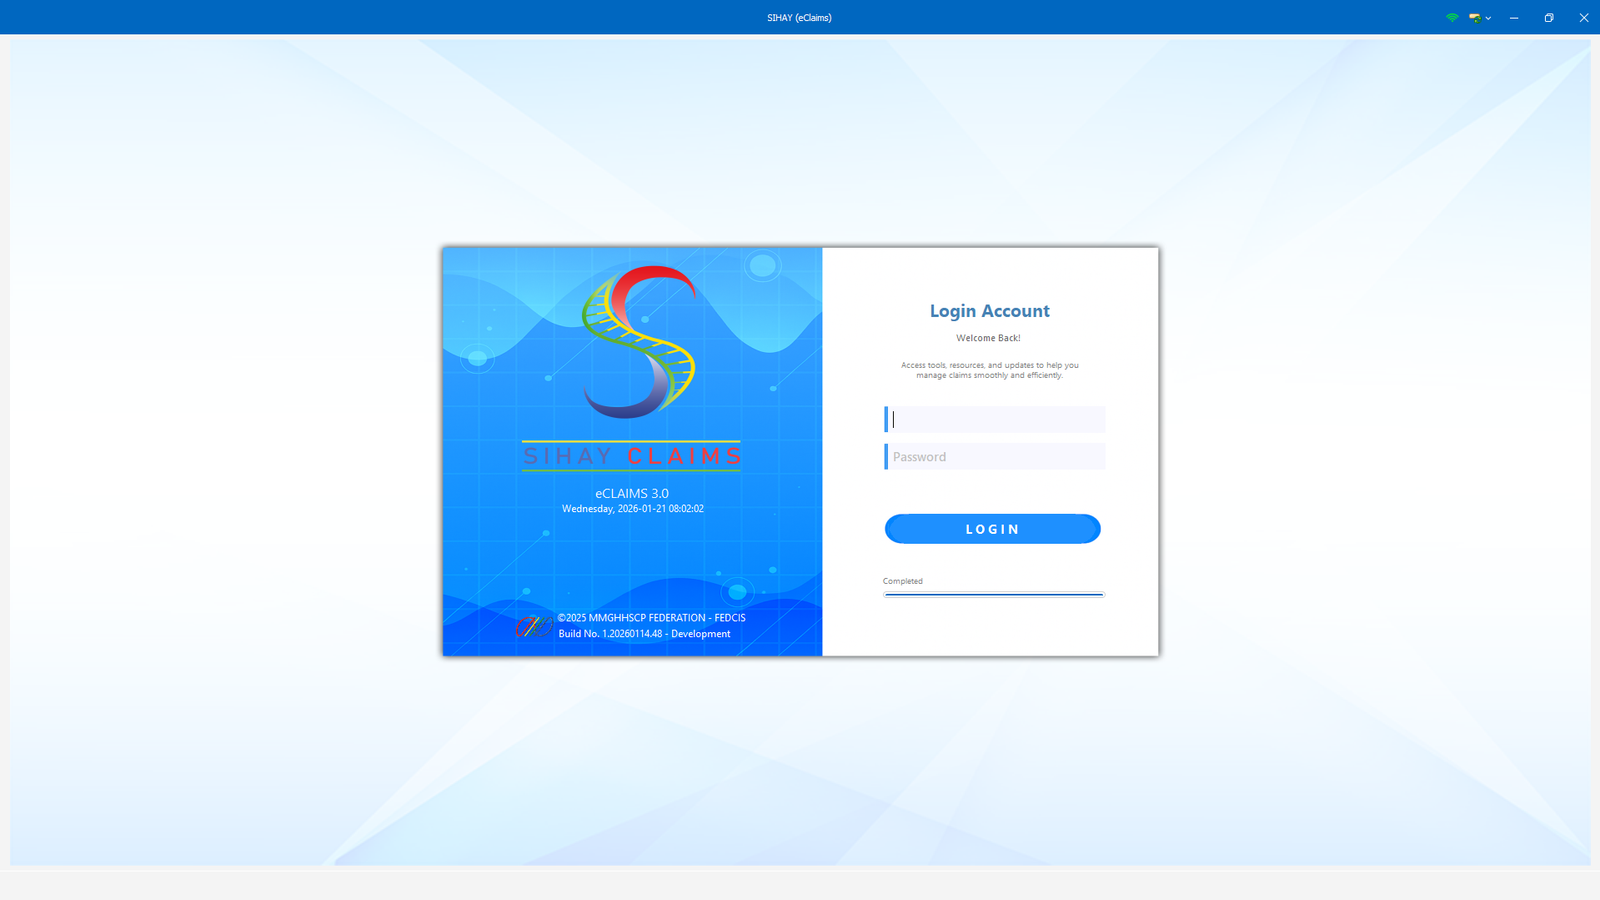
(MMG SIHAY Image 1 Login)
Login Interface
The Login Interface serves as the secure entry point to the PhilHealth eClaims System. This screen allows authorized hospital personnel to access the system using their assigned username and password. To begin, the user must enter their login credentials in the provided fields and click the Login button. Once validated, the system will grant access to the available modules based on the user’s role and permissions.
This interface ensures that only authorized users can process, view, and manage PhilHealth claims, helping protect patient data and maintain compliance with data privacy and security standards. The progress indicator below the Login button shows the system’s status while verifying the credentials. If incorrect information is entered, the user will be prompted to recheck their details before proceeding.
Created with the Personal Edition of HelpNDoc: Create Professional CHM Help Files with HelpNDoc's Easy-to-Use Tool
Dashboard
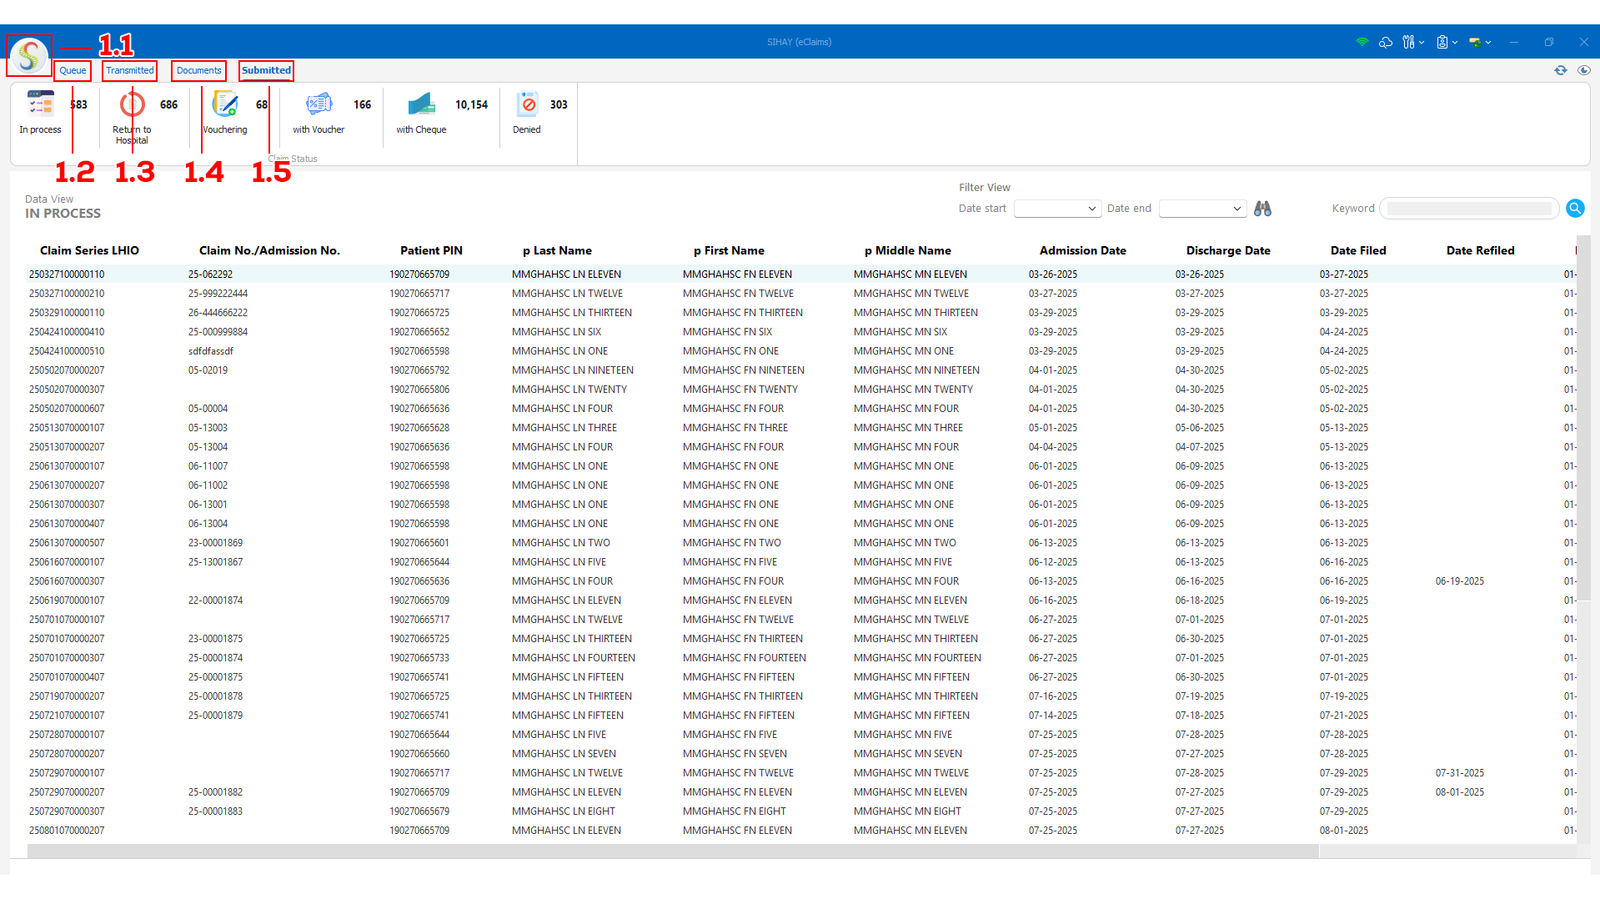
(MMG SIHAY Image 1.1.1 Dashboard)
1. Main Navigation and Claims Management Area
This section of the system contains the primary navigation tabs used for managing PhilHealth eClaims. Each tab provides access to specific functions that support the full lifecycle of claim processing—from initial encoding to final claim status monitoring.
1.1 Main Menu / Feature Navigation
This area displays the main system menu and available features based on the user’s access level. It serves as the central navigation point of the system, allowing users to switch between different claim processing stages, documents, and reports. Additional system tools and shortcuts may also appear here depending on user role and system configuration.
1.2 Queue Tab (Start of Claims Processing)
The Queue tab is the starting point for processing PhilHealth claims. This is where users can:
- Create new claims for admitted patients
- Edit or update existing claim records
- Delete invalid or duplicate entries (subject to user permissions)
- Check patient eligibility with PhilHealth
- Prepare and manage CF2 and CF4 documents
- Process claims for transmittal or remove them from an existing transmittal if needed
All claims listed under this tab are considered active and under preparation, making it the primary workspace for claims processors.
1.3 Transmitted Tab (Claims Status Monitoring)
The Transmitted tab allows users to monitor the status of claims that have already been submitted to PhilHealth. This section provides visibility on claims that are:
- Unprocessed
- In process
- With voucher
- With cheque
- Returned to Hospital (RTH)
- Denied
This tab helps users track claim progress and identify actions needed, such as correcting returned claims or following up on pending reimbursements.
1.4 Documents Tab (Claims Forms and Attachments)
The Documents tab contains all required claim-related forms and supporting documents. Users can view, review, and print the following:
- Claim Forms
- Electronic Statement of Account (eSOA)
- PhilHealth Benefit Eligibility Form (PBEF)
- Claim Signature Form (CSF)
- Claim Summary
- Attached Lists and supporting files
This tab ensures that all required documents are complete and properly prepared before and after claim submission.
1.5 Submitted Tab (Claims Overview by Status)
The Submitted tab provides an organized view of all submitted claims based on their current processing status. Users can easily review claims categorized as:
- In process
- Returned to Hospital
- Vouchering
- With voucher
- With cheque
- Denied
This section is mainly used for monitoring, reporting, and follow-up purposes, allowing users and administrators to assess claim performance and reimbursement outcomes.
Created with the Personal Edition of HelpNDoc: Modernize your help files with HelpNDoc's WinHelp HLP to CHM conversion tool
Navigational Menu
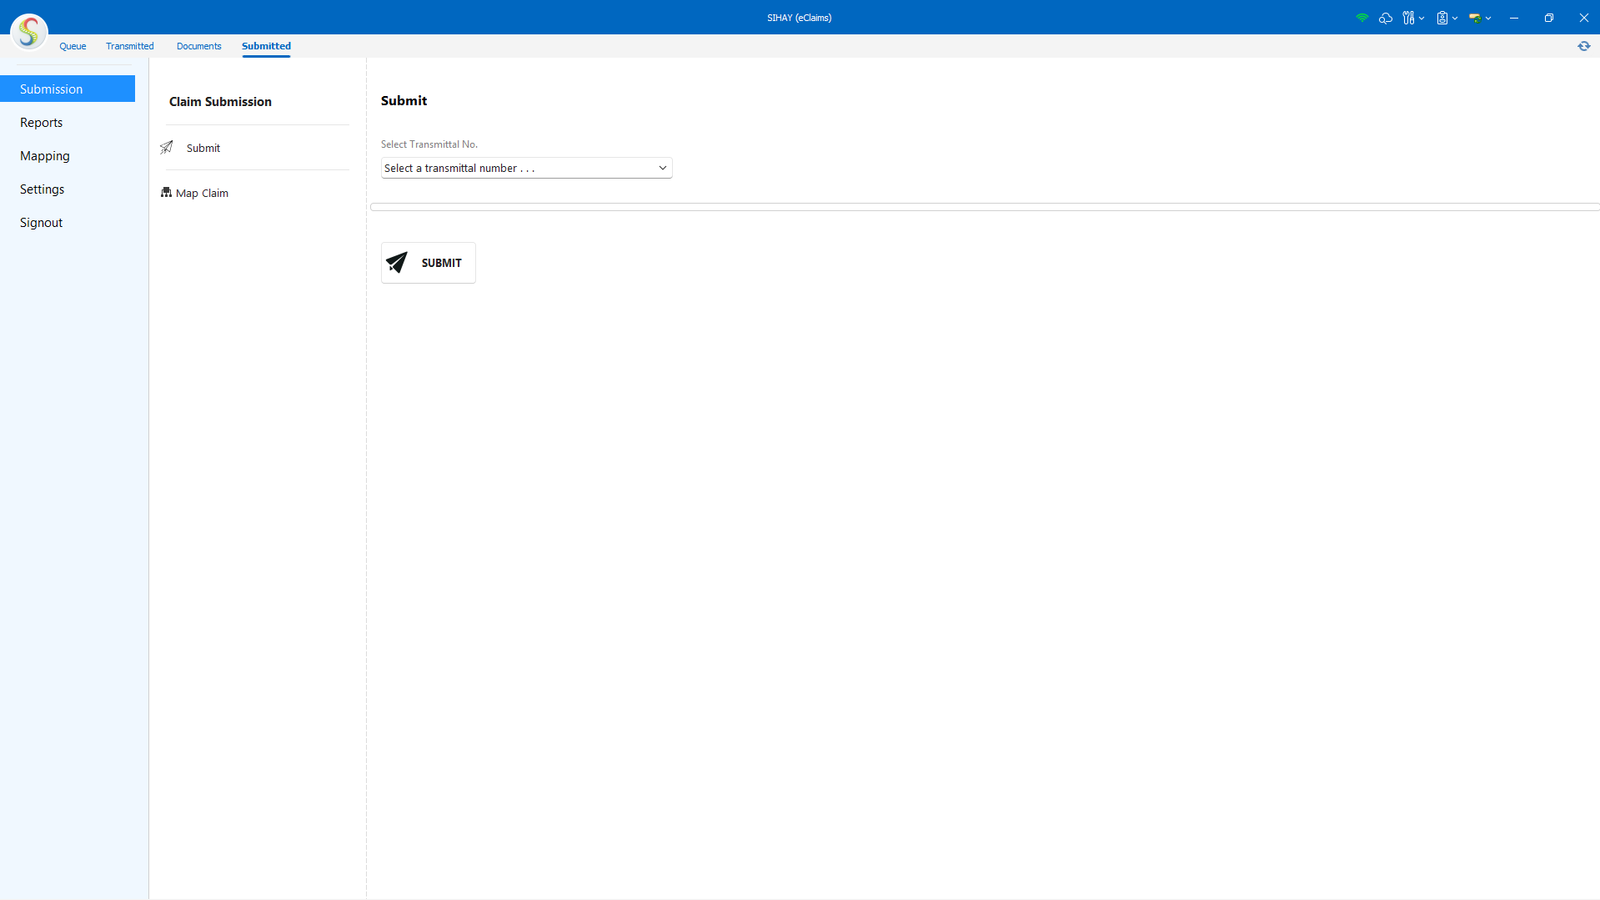
(MMG SIHAY Image 1.2.1 Submission Tab)
(MMG SIHAY Image 1.3.1 Reports Tab)
The Reports tab provides access to all system-generated reports related to PhilHealth eClaims processing. This section allows users to view, generate, and review reports that summarize claim activities and financial transactions within the system. Available reports include PhilHealth Reconciliation, IBNR (Incurred But Not Reported), Transmittal Reports, Claim Summary, PhilHealth Claims, Unsubmitted Claims, and Claims and Service Fee Reports.
These reports support monitoring, auditing, and reconciliation of submitted and processed claims. They help hospital staff track claim status, validate reimbursements, identify pending or unsubmitted claims, and ensure accurate reporting for management and PhilHealth compliance purposes.
(MMG SIHAY Image 1.4.1 Mapping Tab)
The Mapping tab is used to align the hospital’s internal items with the corresponding PhilHealth Item Codes. This ensures that all charges included in a claim are properly recognized and processed by PhilHealth. In this section, users can map items under the following categories: Room and Board, Drugs and Medicines, Laboratory and Diagnostics, Operating Room, Medical Supplies, and Other Chargeable Items.
By mapping each hospital product or service to its correct PhilHealth Item Code, the system helps prevent claim errors, reduce returned claims, and support accurate benefit computation. Proper mapping should be completed before claim submission to ensure that all charges are correctly classified and accepted by PhilHealth. Go to Mapping Section to see how to map.
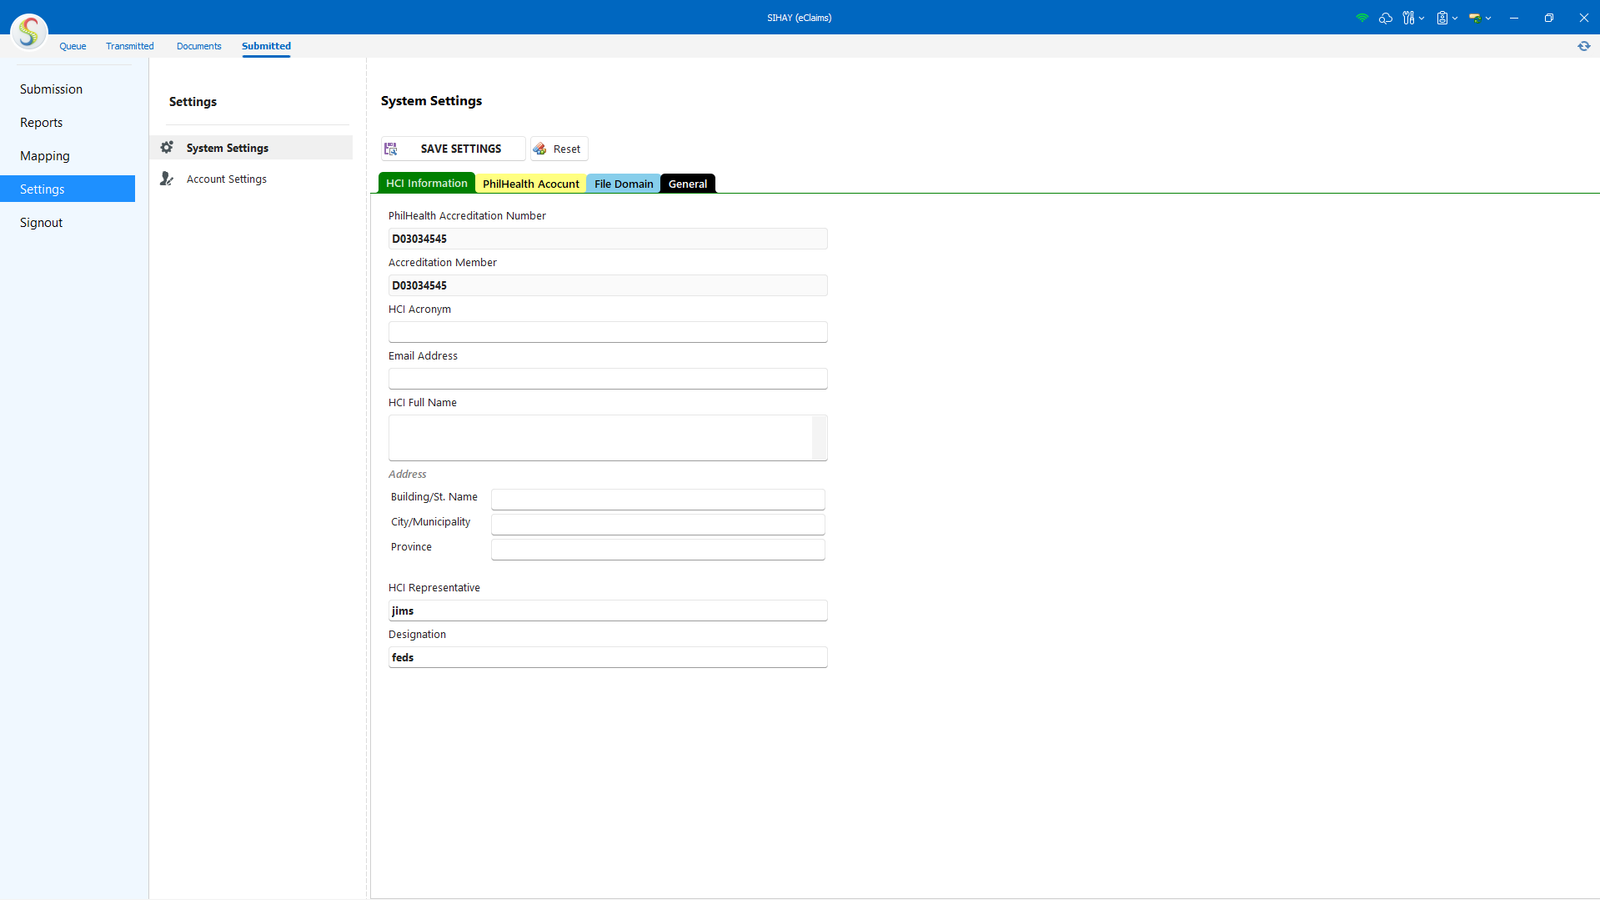
(MMG SIHAY Image 1.5.1 Settings Tab)
The Settings tab is used to configure and maintain essential system and facility information. In this section, users can set up and manage the Health Care Institution (HCI) Information, PhilHealth Account details, File Domain, and other General system settings required for proper system operation.
This tab also allows authorized users to create, update, and manage user accounts for system access. Changes made in the Settings tab help ensure accurate facility information, secure system access, and compliance with PhilHealth requirements. For instructions on updating facility details, refer to the Setup section. For user account management, see Register or Update User for guidance.
Created with the Personal Edition of HelpNDoc: Maximize Your Productivity with HelpNDoc's Efficient User Interface
How to:
Created with the Personal Edition of HelpNDoc: Effortlessly upgrade your WinHelp HLP help files to CHM with HelpNDoc
Encode or Edit CF2
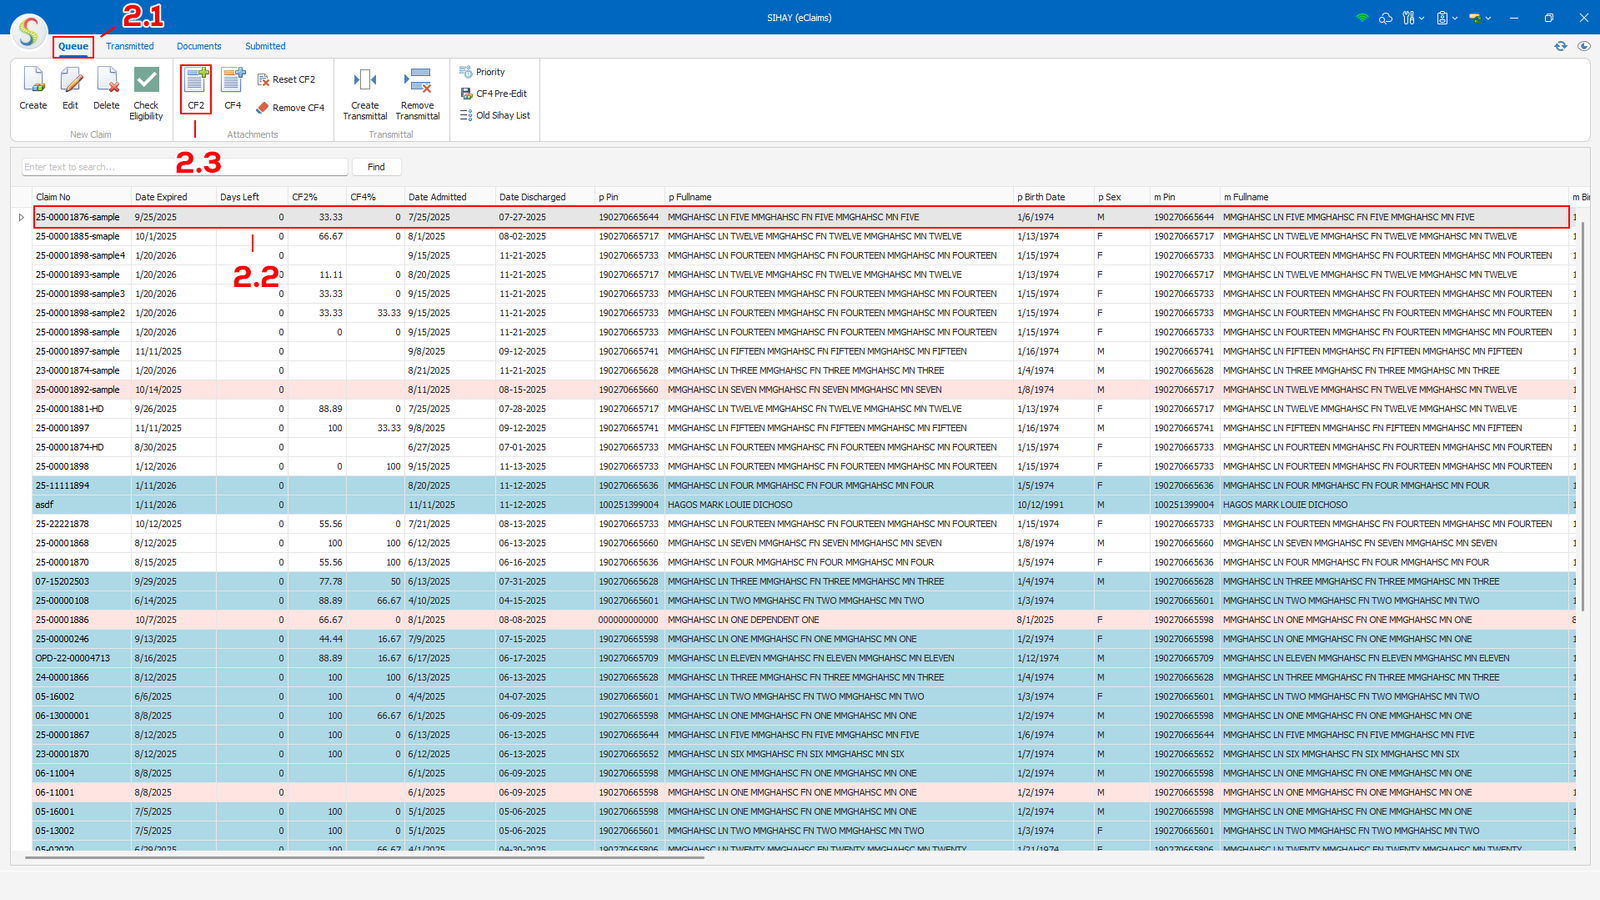
(MMG SIHAY Image 2.1.1 CF2)
To encode Claim Form 2 (CF2), go to the Queue tab (see 2.1), select the patient record you want to process (see 2.2), then click the CF2 button (see 2.3) to open the Claim Form 2 encoding window.
(MMG SIHAY Image 2.1.2 CF2)
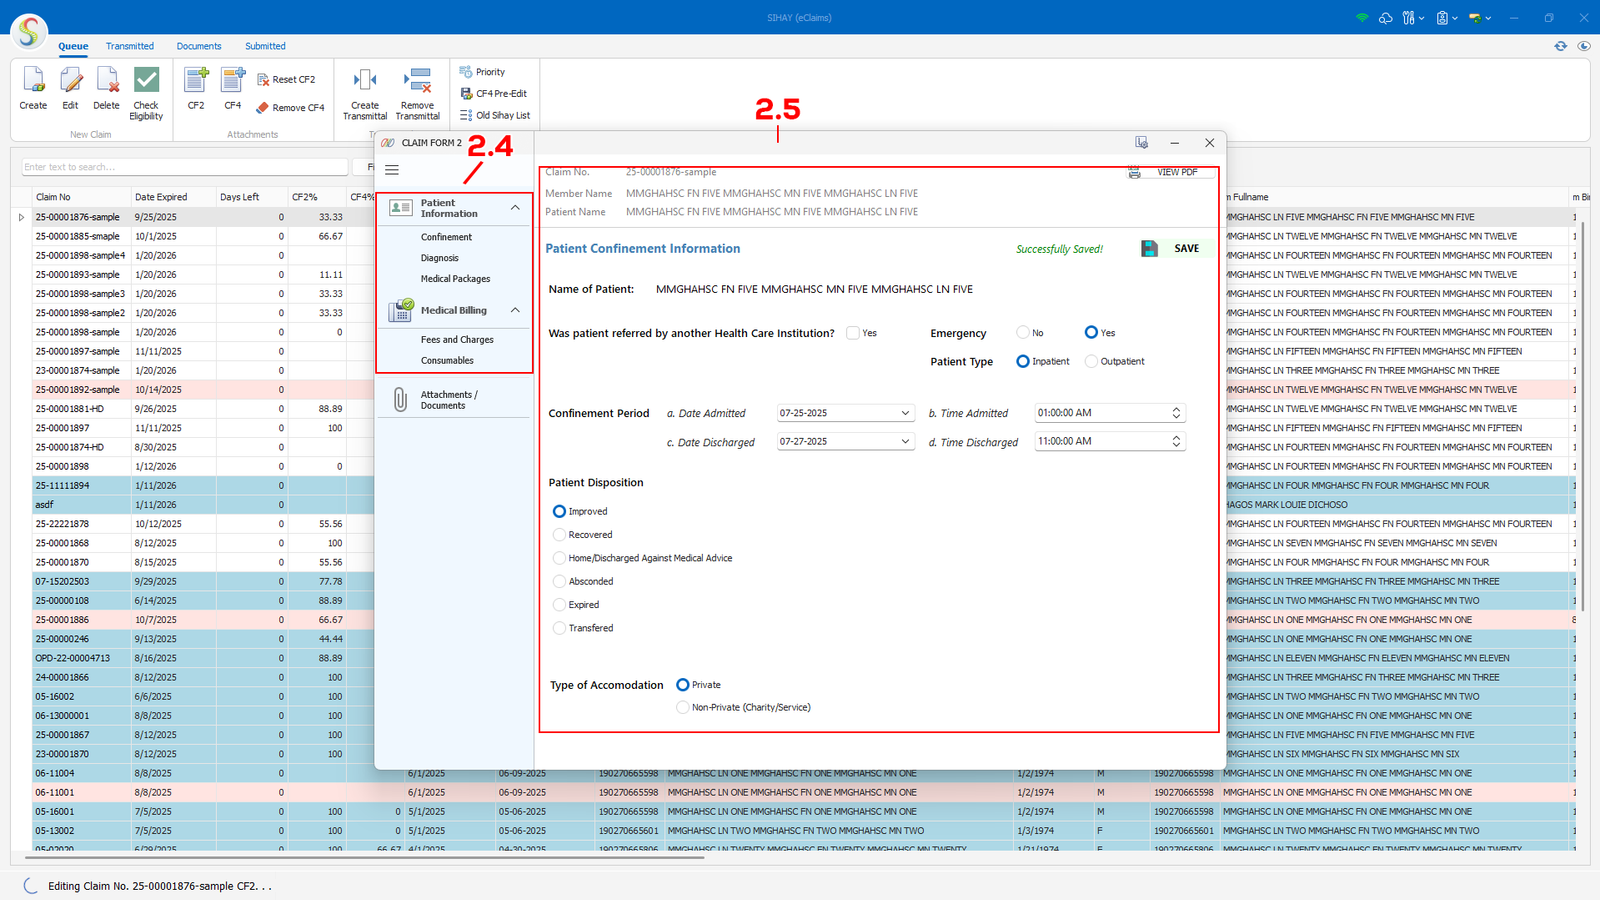
The Claim Form (CF2) window (see 2.4), where all patient confinement and billing information is entered and edited. This window displays the selected claim number and allows users to input, review, and save patient details required for PhilHealth claims processing. The Save button confirms that any changes made are successfully recorded.
The navigation panel of the Claim Form (see 2.5). It allows users to move between different sections of the claim, such as Patient Information, Confinement, Diagnosis, Medical Packages, Medical Billing, Fees and Charges, Consumables, and Attachments/Documents. Clicking on each menu item will display the corresponding form on the main screen for easy and organized data entry. Complete all this sections from top to bottom to complete the CF2 form.
Created with the Personal Edition of HelpNDoc: Keep Your PDFs Safe from Unauthorized Access with These Security Measures
Upload Documents
(MMG SIHAY Image 2.2.1 Uploading)
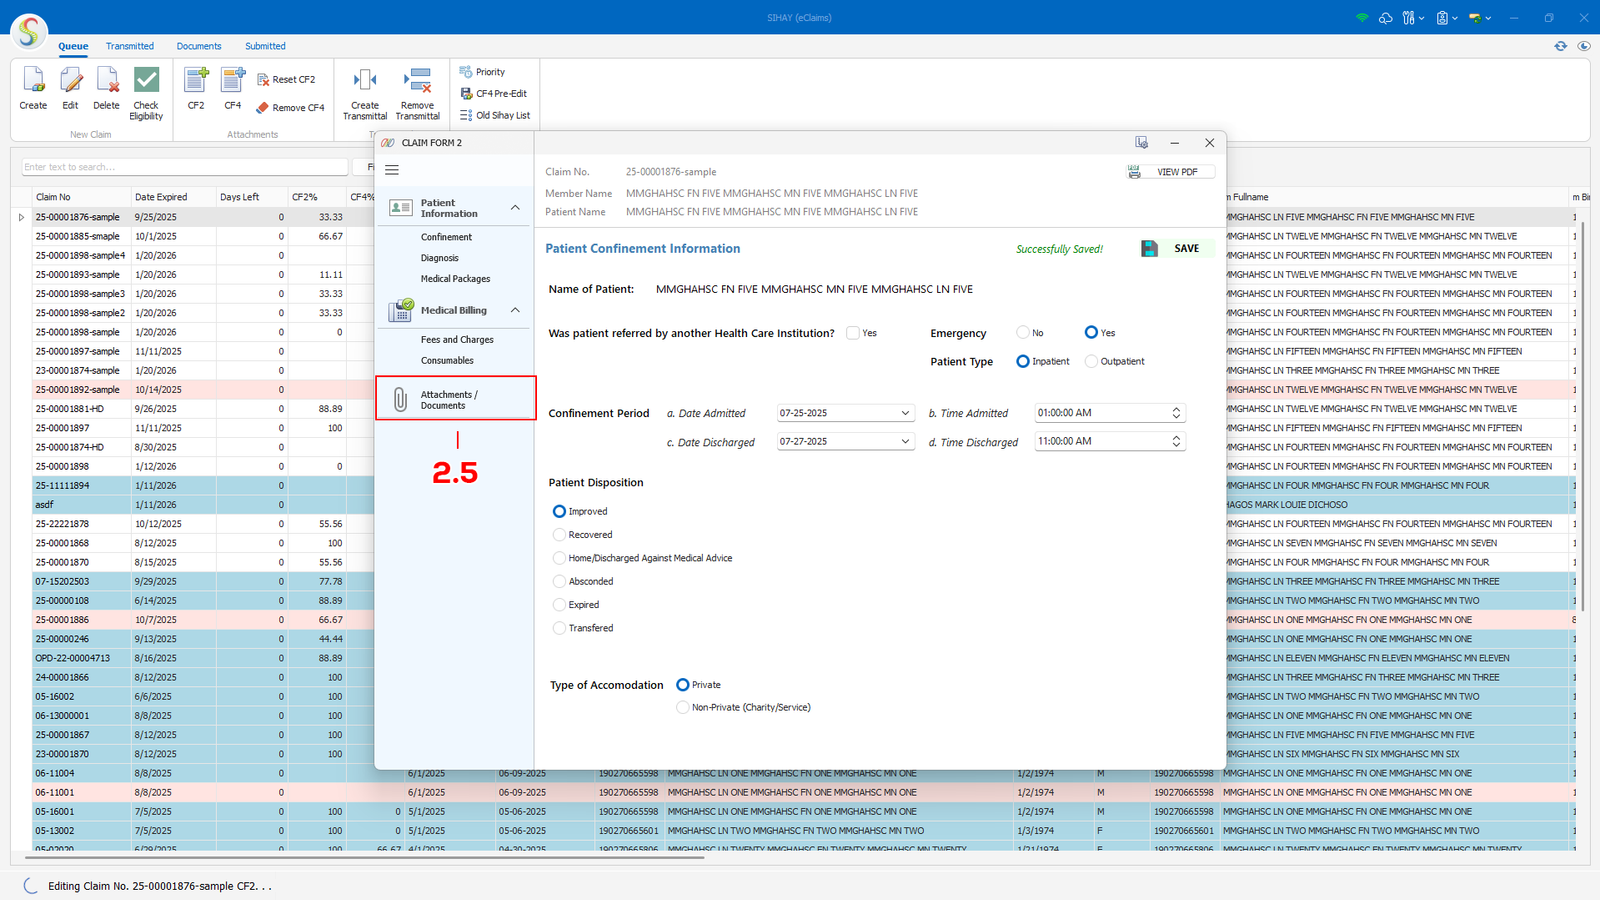
To upload necessary files, on the Claim Form 2 window, click the Attachments / Documents tab (see 2.5) to upload/attach documents.
Created with the Personal Edition of HelpNDoc: Free iPhone documentation generator
Process Transmittal
![]()
(MMG SIHAY Image 2.3.1 Transmittal)
To process a transmittal, ensure that Claim Form 2 (CF2) is 100% completed. Select the patient record you want to include in the transmittal (see 2.6), then click Create Transmittal (see 2.7).
The system will display an indicator or notification if the CF2 is not yet fully completed, preventing the transmittal from being processed until all required fields are filled.
Created with the Personal Edition of HelpNDoc: Maximize Your Productivity with HelpNDoc's CHM Help File Creation Features
Encode or Edit CF4
(MMG SIHAY Image 2.4.1 Transmittal)
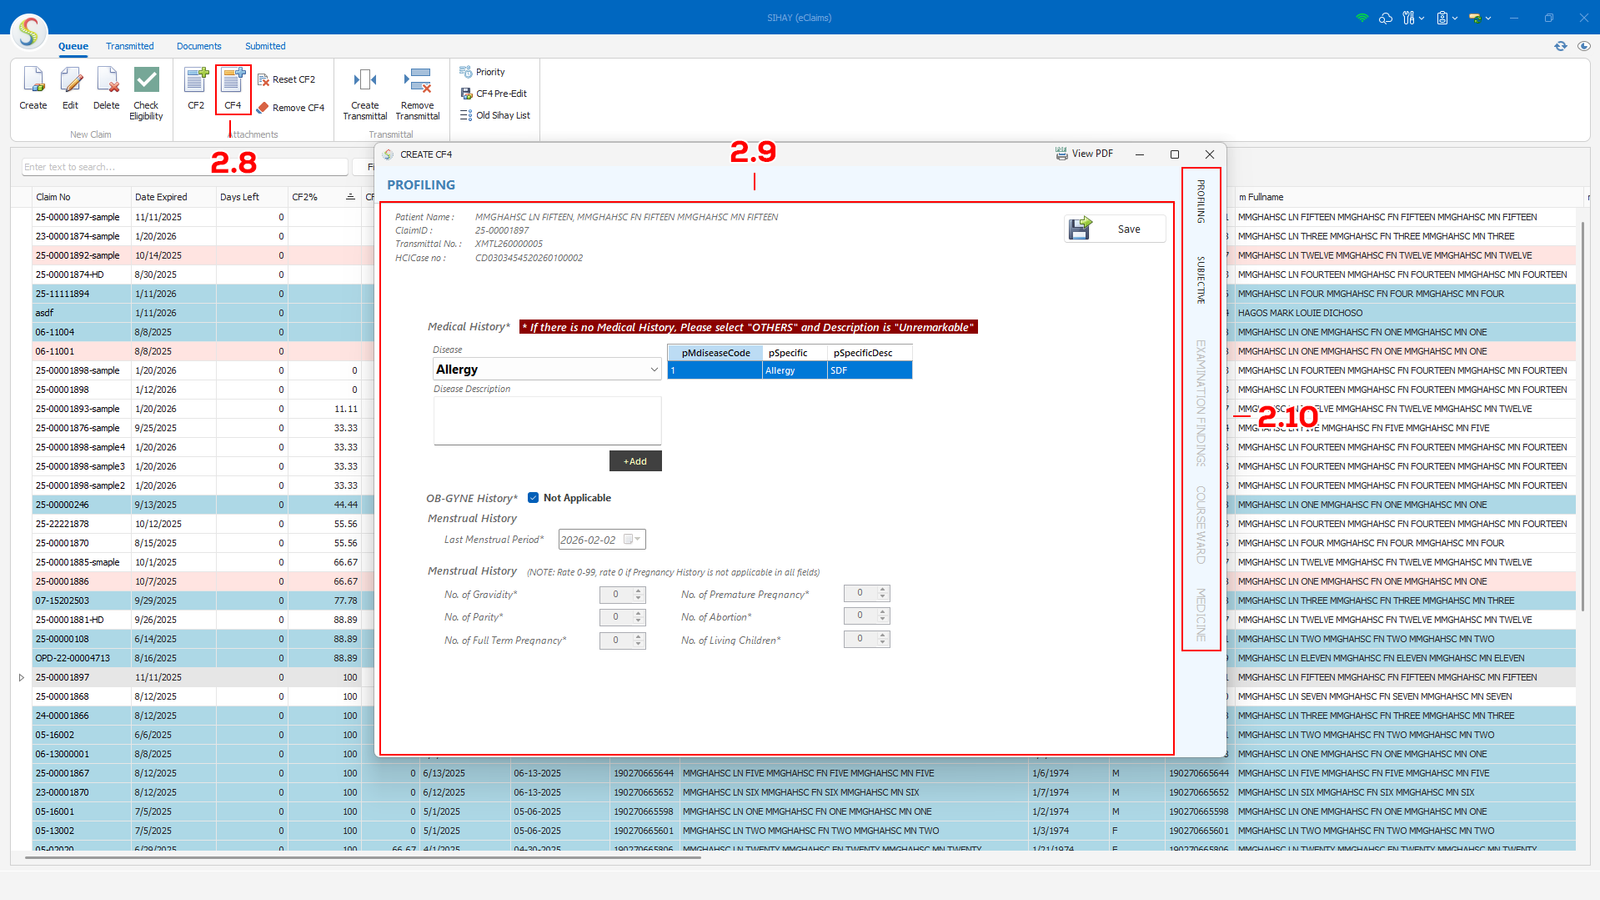
To encode Claim Form 4 (CF4), select the patient record you want to process and click the CF4 button (see 2.8). The CF4 window will then open, allowing you to enter the required information in the main form area (see 2.9).
Use the side navigation tabs (see 2.10) to access additional sections such as Profiling, Subjective, Examination Findings, Course Ward, and Medicine. Complete all required fields in each section to fully accomplish the CF4.
Created with the Personal Edition of HelpNDoc: Qt Help documentation made easy
Process Claims
Created with the Personal Edition of HelpNDoc: Free help authoring environment
Submit Claims
Created with the Personal Edition of HelpNDoc: What is a Help Authoring tool?
Register or Update User

(MMG SIHAY Image 2.1.1 User)
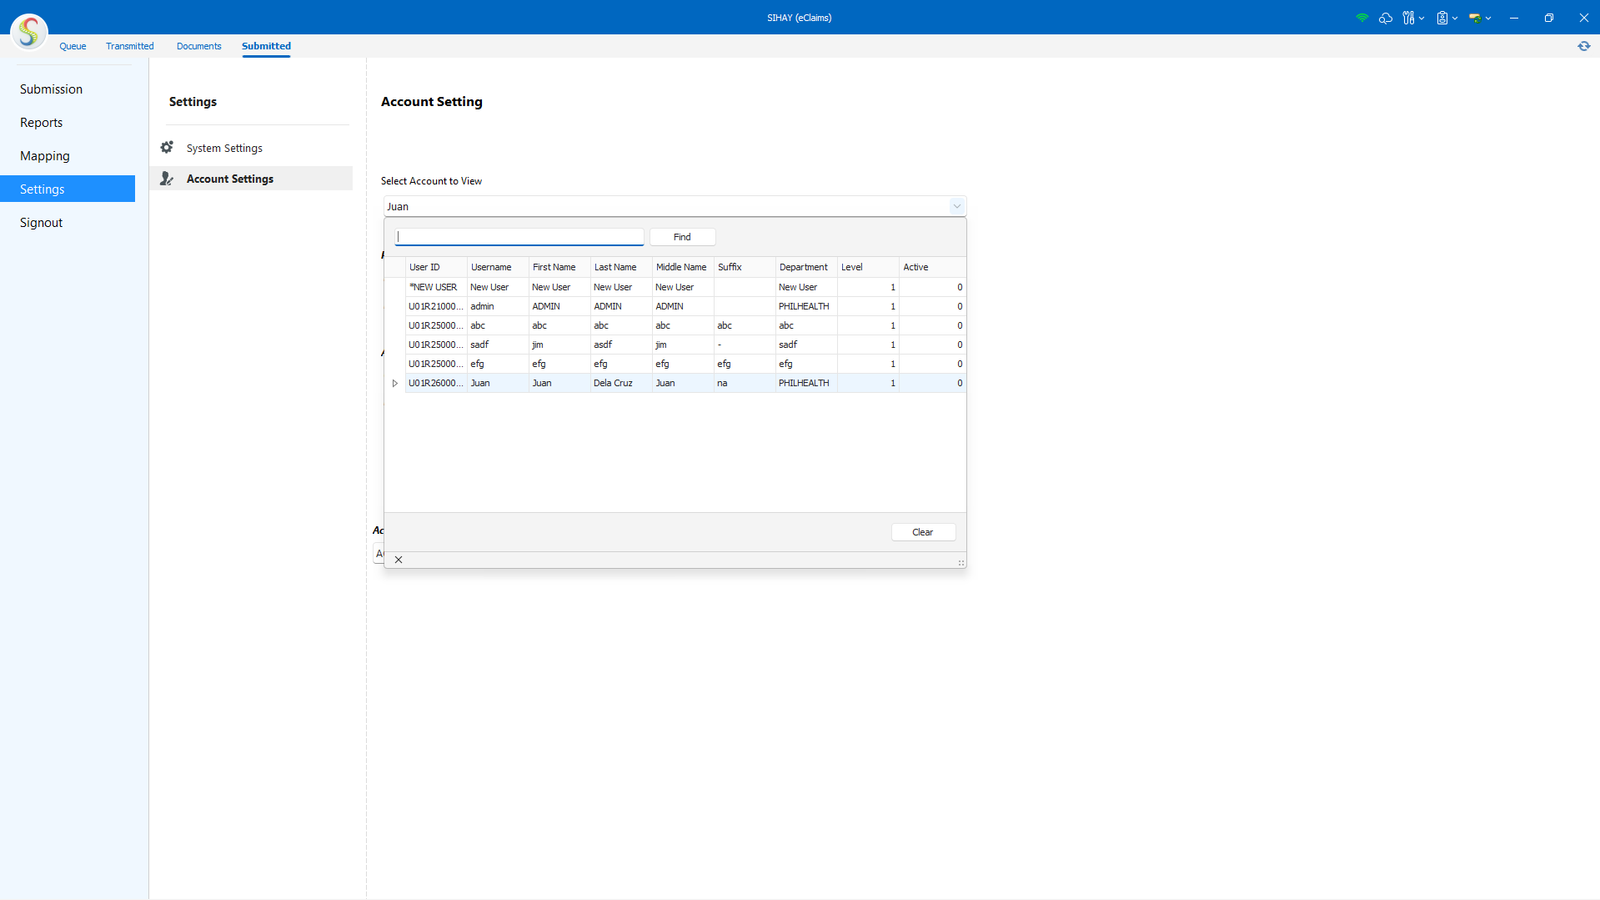
To register a new user, navigate to the Account Settings tab. From the Select Account to View drop-down menu (see 2.1), choose New User. Enter the required user information in the provided fields (see 2.2), then assign the appropriate access level or permissions based on the user’s role (see 2.3).
Once all required details have been completed and reviewed, click the Save User button to create the new account.
(MMG SIHAY Image 2.1.2 User)
To update a user’s information or change a password, go to the Account Settings tab and select the user account from the Select Account to View drop-down menu. Once the account is loaded, modify the necessary details such as user information or password.
After completing the changes, click the Save User button to apply and store the updates.
Created with the Personal Edition of HelpNDoc: Full-featured Help generator
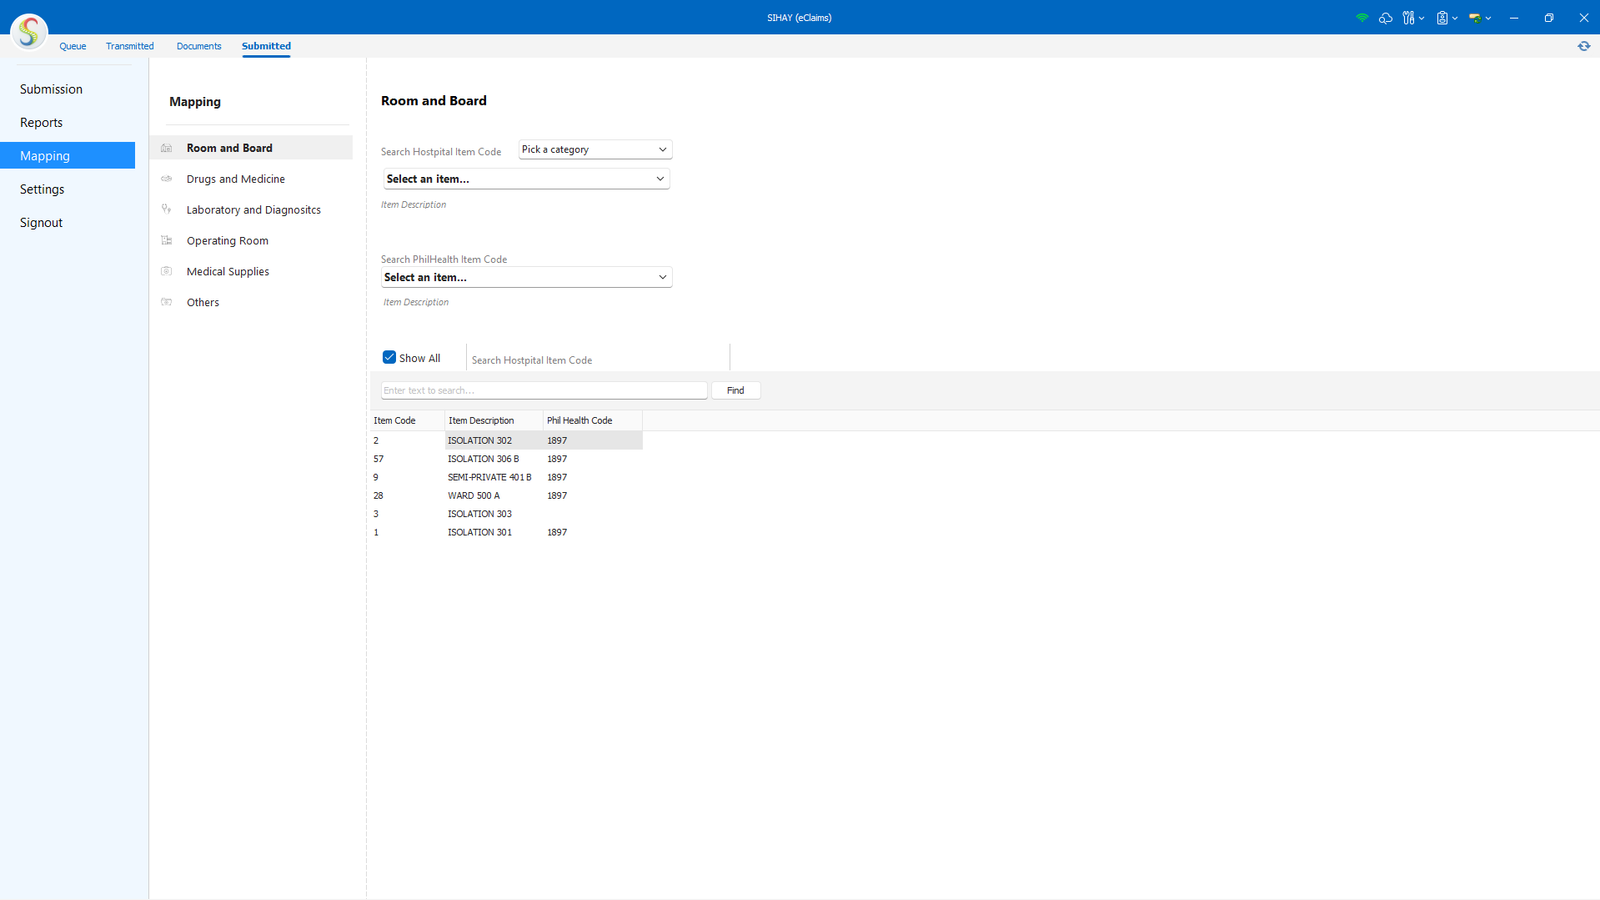
Mapping
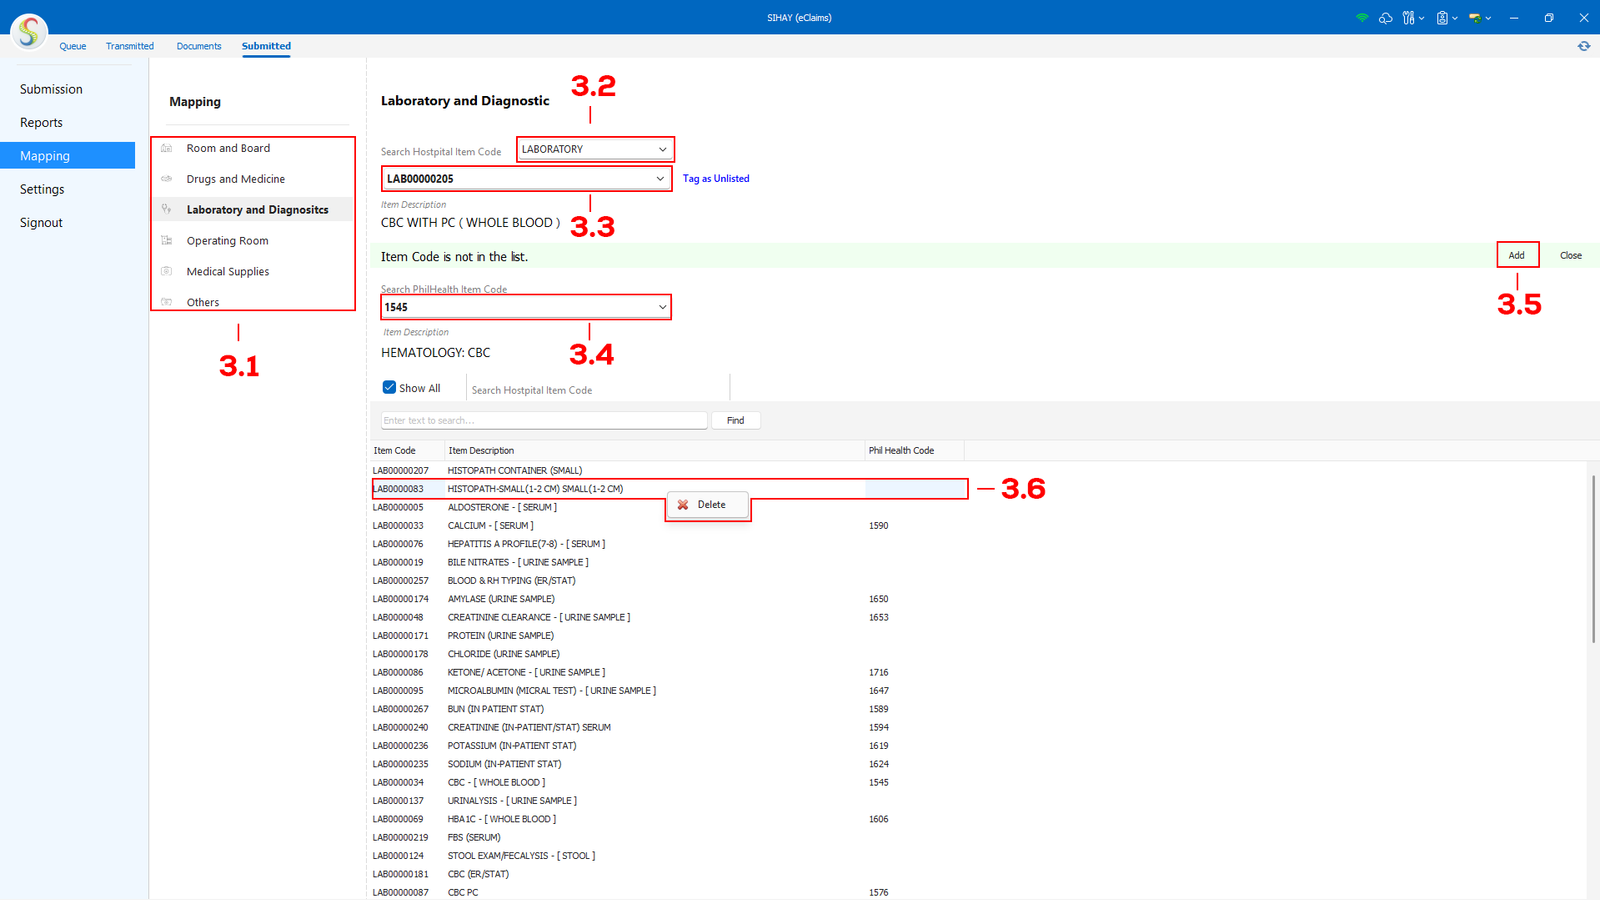
(MMG SIHAY Image 3.1.1 Mapping)
Mapping Items to PhilHealth Codes
In the Mapping tab, begin by selecting the appropriate category to map (see 3.1). From the Hospital Category drop-down menu (see 3.2), choose the category where the item belongs. Next, select the Hospital Item Code from the drop-down list (see 3.3). Once selected, the item description will be displayed below the menu. If the item has not yet been mapped, a notification message will appear indicating that the item code is not in the list.
After selecting the hospital item, choose the corresponding PhilHealth Item Code from the PhilHealth drop-down menu (see 3.4). Ensure that the selected code exactly matches the item provided by PhilHealth. Click the Add button (see 3.5) to save and complete the mapping.
To remove an item from the mapping list, select the item using a left click, then right-click to display the Delete option (see 3.6). Click the Delete button to remove the item from the mapping.
Created with the Personal Edition of HelpNDoc: Easy EPub and documentation editor
Setup
Created with the Personal Edition of HelpNDoc: Easy EBook and documentation generator
Report
Created with the Personal Edition of HelpNDoc: Streamline your documentation process with HelpNDoc's WinHelp HLP to CHM conversion feature
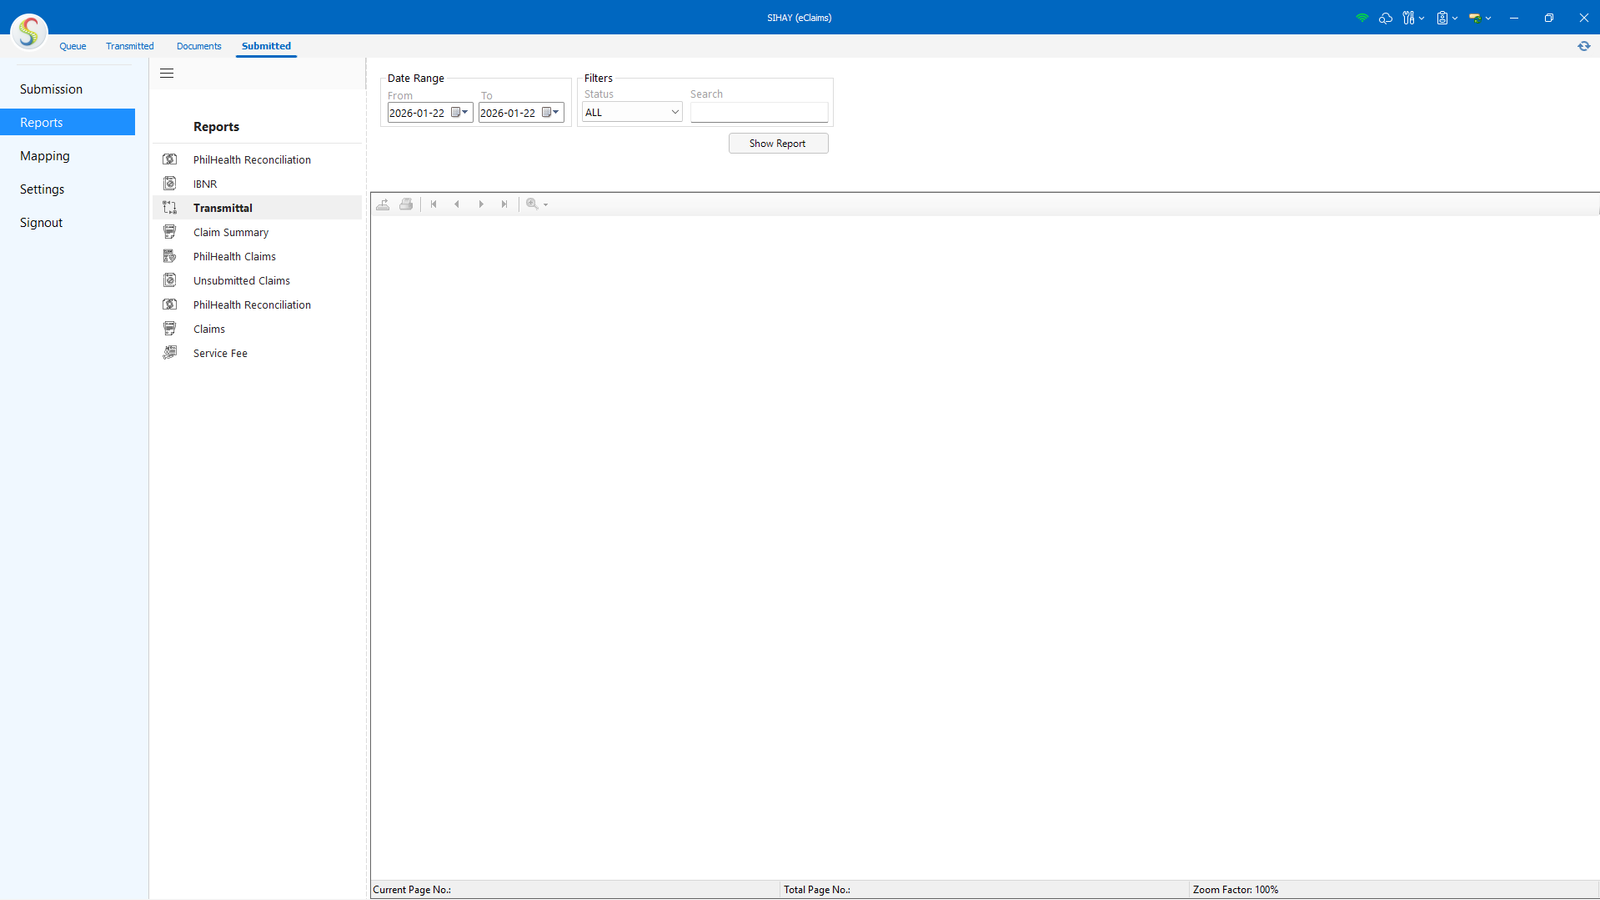
View/Download/Print
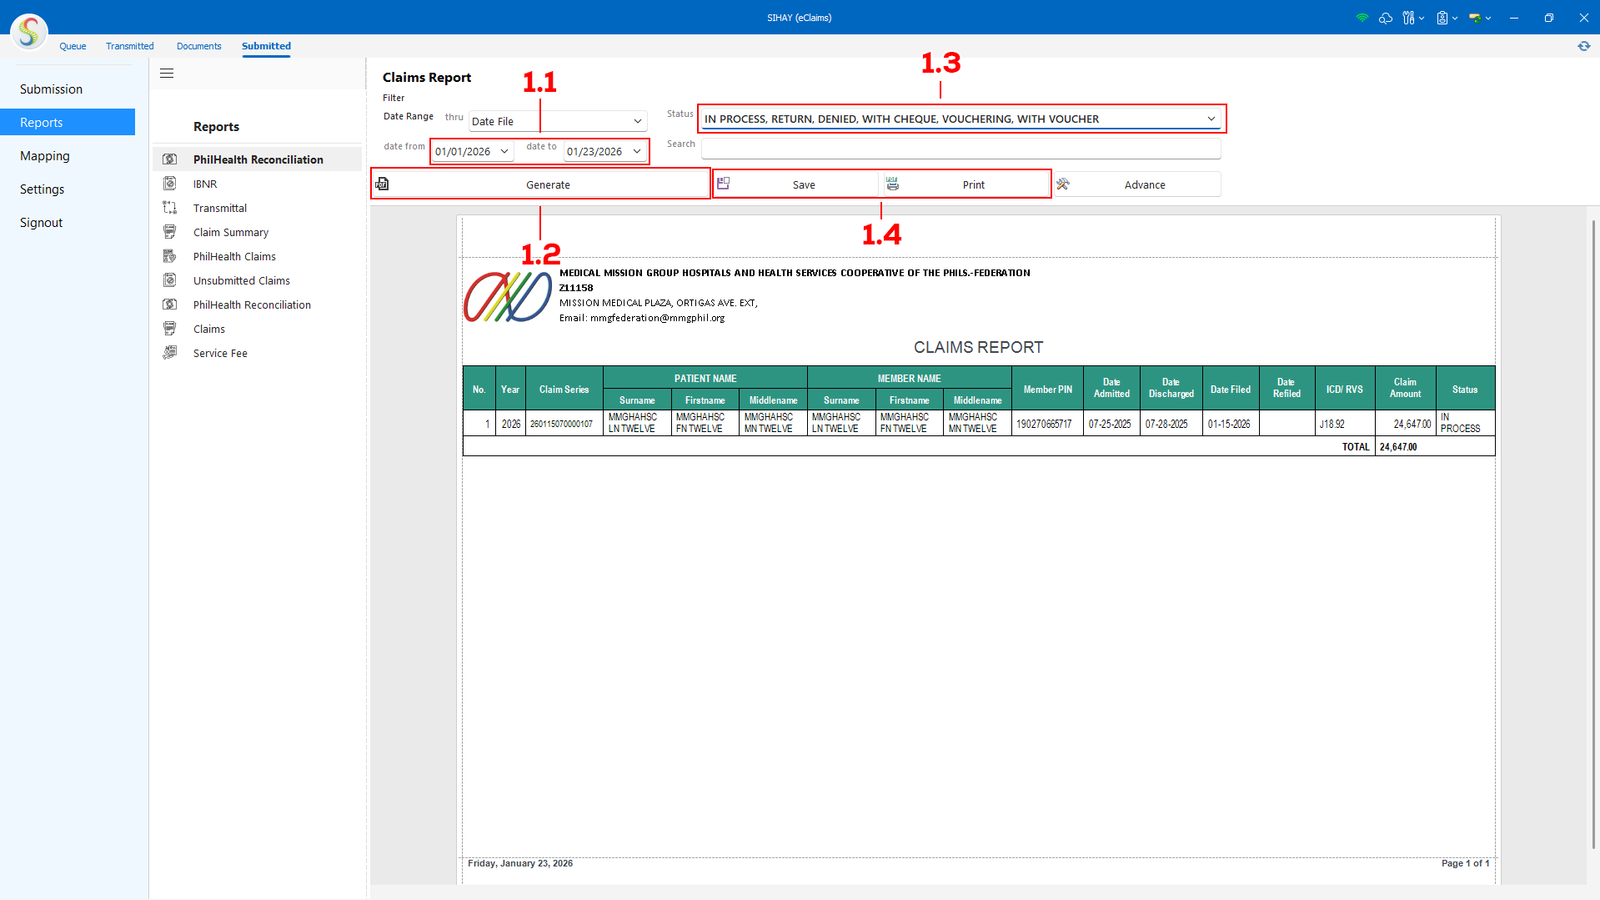
(MMG SIHAY Image 1 Report)
Report Viewing and Generation
Most report screens in the system share the same set of features for generating and viewing reports. Users can select the required date range by setting the Date From and Date To fields (see 1.1), then click the Generate button (see 1.2) to display the report data in the table below.
Some report screens also provide additional filtering options (see 1.3), allowing users to narrow down the report results based on specific criteria, depending on the report type. Once the report is generated, users may choose to save the report for future reference or click the Print button to produce a hard copy (see 1.4).
Created with the Personal Edition of HelpNDoc: Easily create iPhone documentation
Copyright © <Dates> by <Authors>. All Rights Reserved.